Well-executed landscape lighting transcends mere functionality. It transforms your property into a captivating after-dark oasis, enhancing both beauty and security.
A thoughtful plan does more than illuminate pathways. It reveals the hidden character of your home and garden, creating ambiance while extending your living space. For homeowners across the Monterey Peninsula, from the coastal bluffs of Santa Cruz to the rolling hills of Salinas, the right lighting can accentuate unique architectural details and make outdoor areas more inviting year-round.
This guide presents 10 sophisticated and actionable landscape lighting design ideas to inspire your next project. We move beyond basic fixtures to explore techniques that create depth, drama, and dimension. From dramatic uplighting that celebrates our region's iconic oaks to subtle moonlighting that mimics the natural Central Coast glow, you will discover how a layered approach can redefine your home’s exterior. To truly transform your home's exterior after dark, it's essential to consider foundational elements like safe and proper cable burial for outdoor systems, ensuring your lighting installation is both beautiful and secure. Let’s illuminate your vision and turn your landscape into a work of art.
1. Uplighting for Trees and Architecture
Uplighting is a quintessential technique in landscape lighting design, creating dramatic visual impact by reversing the natural order of light. Fixtures are placed at or below ground level and aimed upward. This approach masterfully accentuates the vertical lines and textures of trees, architectural facades, and garden sculptures, transforming them into stunning nighttime focal points.
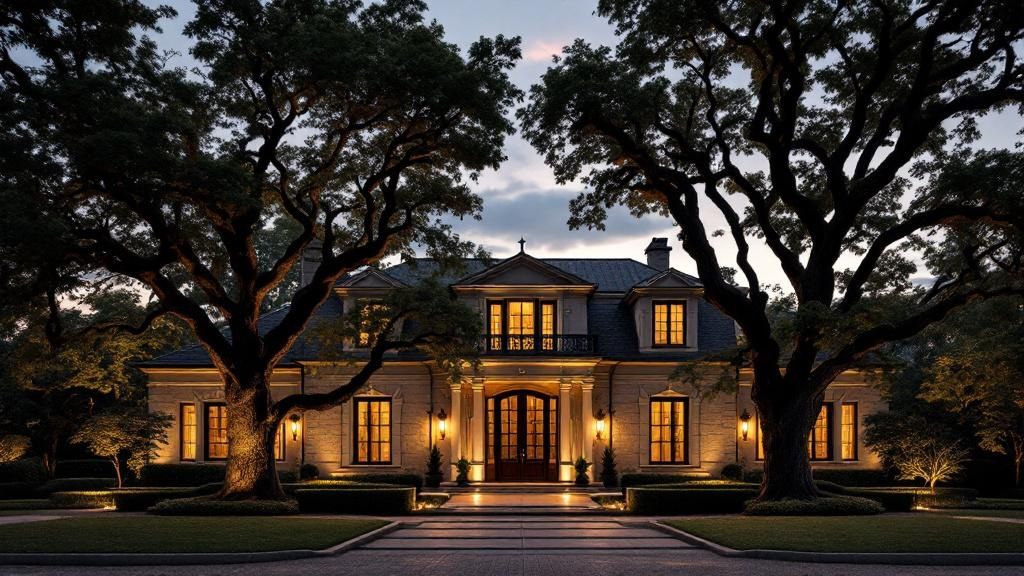
This method adds a sense of grandeur and depth to your property. By grazing the surface of a stone wall or the bark of a mature oak, uplighting reveals intricate textures that sunlight often washes out. This is one of the most effective landscape lighting design ideas for establishing a high-end, curated aesthetic.
Implementation Tips for Uplighting
To achieve a professional look and avoid common pitfalls like glare or light pollution, consider these specific details:
- Fixture Placement: Position spotlights approximately 3 to 6 feet from the base of a tree. A closer placement creates a narrow, dramatic "hot spot," while a greater distance provides a broader, softer wash of light.
- Color Temperature: For most residential applications, a warm white light (2700K to 3000K) is ideal. It creates a welcoming, sophisticated ambiance that complements the natural landscapes of the Monterey Peninsula.
- Glare Control: Always use glare shields or shrouds on your fixtures. This directs light precisely onto the target and prevents it from spilling sideways, ensuring it doesn't create light trespass into neighbors' windows or blind passersby.
- Seasonal Adjustments: Remember that deciduous trees lose their leaves. The bare, intricate branches of winter offer a completely different, yet equally beautiful, canvas for uplighting compared to a full summer canopy.
2. Pathway and Walkway Lighting
Pathway and walkway lighting masterfully blends safety with aesthetics, guiding movement along paths, steps, and driveways after dark. This technique uses fixtures like bollards, in-ground well lights, and low-profile path lights to create a visible, secure route. More than just functional, it adds a layer of sophisticated charm, transforming a simple walk into a guided experience.
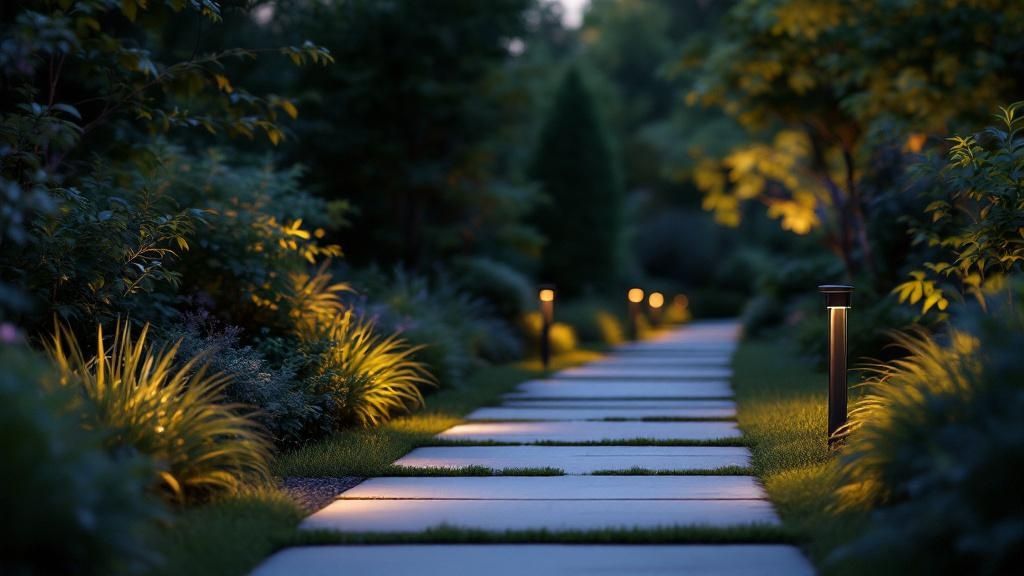
Effective pathway illumination is a cornerstone of comprehensive landscape lighting design ideas, ensuring safe navigation while enhancing your property's curb appeal. This approach is essential for creating a welcoming and accessible environment for family and guests, especially on properties with uneven terrain or long driveways common in our coastal communities.
Implementation Tips for Pathway and Walkway Lighting
Achieving a balanced and beautiful pathway requires careful planning to avoid the "runway effect" of overly bright, straight lines.
- Fixture Spacing: For even, gentle illumination, space fixtures approximately 6 to 8 feet apart. Staggering them on opposite sides of the path creates a more natural, meandering feel.
- Color Temperature: A warm white light (2700K) is highly recommended. This temperature casts a soft, inviting glow that feels natural and complements surrounding plant life.
- Fixture Height and Placement: Install fixtures so the light source is about 12 to 18 inches above the ground. Placing them 2 to 3 feet back from the path's edge prevents tripping hazards and allows the light to spread effectively.
- Glare Management: Choose fixtures with built-in shrouds or "hats" that direct light downward onto the path. This prevents upward glare, ensuring the focus remains on safe navigation.
3. Water Feature Lighting
Water feature lighting is a specialized landscape lighting design idea that transforms ponds, fountains, and waterfalls into mesmerizing nocturnal displays. By using submersible or strategically placed fixtures, you can illuminate the movement and texture of water, creating magical reflections and a serene ambiance. This technique turns a standard water element into a dynamic, living art piece after sundown.
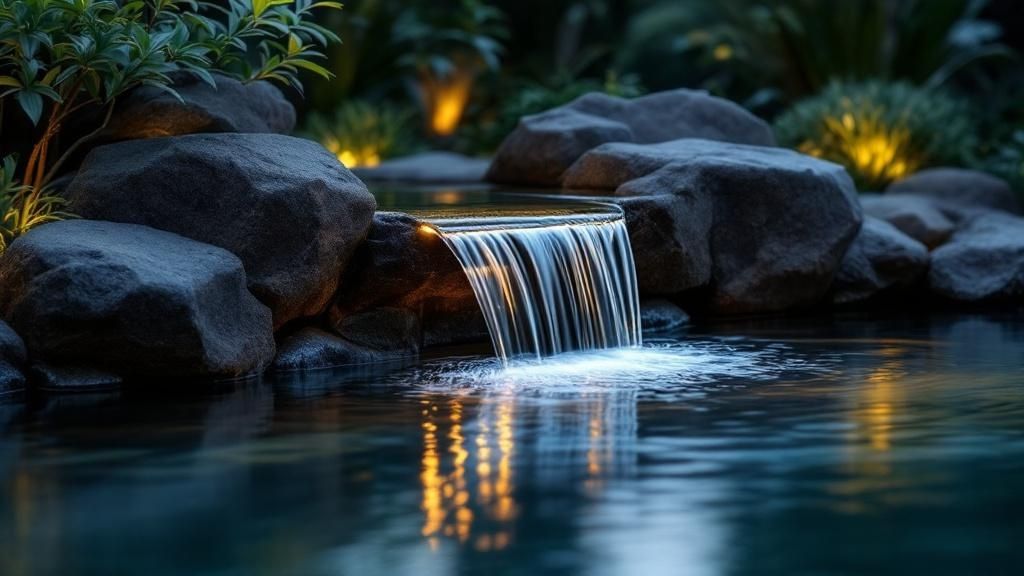
The interplay of light and water adds a layer of sophistication and tranquility to any landscape. From the dramatic cascades of a waterfall to the gentle ripples in a koi pond, lighting highlights the water's unique properties. When designing the lighting, it helps to understand the physical construction of the feature. For example, you can learn more about setting up water features like waterfalls and streams to better plan fixture placement.
Implementation Tips for Water Feature Lighting
Proper installation is critical for safety and aesthetic success. To achieve a stunning and safe display, follow these guidelines:
- Prioritize Safety: All lighting systems installed in or near water must be low-voltage and connected to a GFCI (Ground Fault Circuit Interrupter) outlet. This is non-negotiable for preventing electrical hazards.
- Fixture Choice: Use IP68-rated submersible fixtures for underwater applications. For waterfalls, position fixtures behind the cascade to create a beautiful backlit effect without causing surface glare.
- Color Temperature: A warm white light (2700K) is the gold standard for a natural, elegant look that enhances the water's clarity. Use colored lighting sparingly as a temporary accent for parties or special events.
- Maintenance Schedule: Underwater fixtures require regular cleaning. Plan to gently scrub lenses every few months to remove algae and mineral buildup that can dim the light output.
4. Moonlighting and Downlighting
Moonlighting, also known as downlighting, is a sophisticated landscape lighting design idea that artfully mimics the gentle, ethereal glow of the moon. This technique involves mounting fixtures high up in mature trees or on architectural structures, aiming them downward. The result is a soft, broad wash of light that filters through branches and leaves, casting natural, dappled shadows on the ground below.
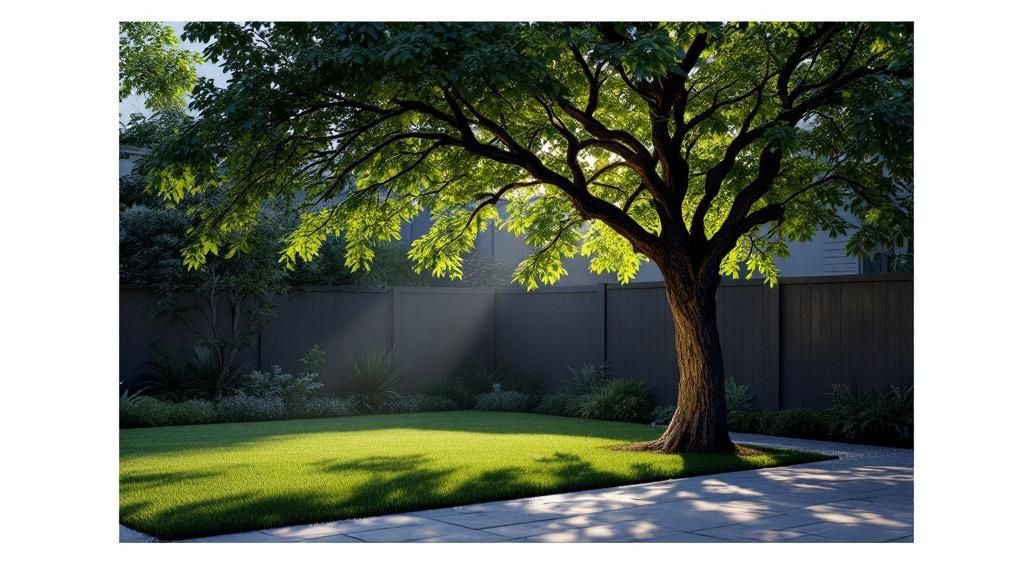
This method creates a subtle, romantic ambiance that feels entirely natural and unforced. Unlike the drama of uplighting, moonlighting provides a sense of serene security and magical beauty, making it perfect for patios and garden paths. It transforms an entire space into a tranquil, usable extension of the home after dark.
Implementation Tips for Moonlighting
To successfully replicate the moon's gentle radiance and avoid an artificial, "stadium-lit" effect, focus on these key details:
- Fixture Height: For the most natural effect, install fixtures at least 20 to 25 feet high in a sturdy, mature tree. This height allows the light to spread and soften, creating more realistic shadows.
- Beam Spread: Use fixtures with a wide flood beam (60 degrees or more). This ensures broad, even coverage over a large area rather than creating harsh, narrow spotlights on the ground.
- Tree Health and Safety: Always consult an arborist to ensure the chosen tree is healthy enough to support fixtures without harm. Use tree-safe mounting hardware and plan for wire management that allows the tree to grow.
- Seasonal Awareness: Remember that the effect will change dramatically as deciduous trees lose their leaves. In winter, the light will be more direct, casting starker shadows from bare branches, which can create a beautiful, graphic look.
5. Accent and Focal Point Lighting
Accent and focal point lighting is a strategic technique that elevates landscape design from mere illumination to a curated art form. It involves using precisely aimed light to draw the eye to specific features, such as sculptures, specimen plants, fountains, or unique architectural details. This method creates a visual hierarchy, guiding an observer's attention and adding layers of interest to the nighttime garden.
This approach transforms ordinary objects into dramatic centerpieces after dark. By carefully highlighting a Japanese maple or a piece of garden art, you create intentional "moments" within the landscape. It’s one of the most powerful landscape lighting design ideas for expressing personal style and showcasing prized elements of your property.
Implementation Tips for Accent Lighting
Creating effective focal points requires precision and an artistic eye. To ensure your highlighted features look their best, consider these details:
- Vary Intensity: Not every focal point should be equally bright. Use more intense light for a primary feature, like a large statue, and softer light for secondary elements, like smaller plants, to create depth.
- Viewing Angles: Position fixtures to flatter the object from the most common viewing points, such as a patio or main window. Check for harsh shadows or glare from multiple angles.
- The 'Rule of Three': When grouping focal points, using an odd number (like three or five) often creates a more natural and aesthetically pleasing composition than even numbers do.
- Warm Color Temperature: A warm white light (2700K) is especially effective for organic materials like plants and stone. It enhances natural colors and textures for a richer look. You can learn more about landscape lighting tips on homelighterinc.com.
6. String Lights and Festoon Lighting
String lights, often called festoon or bistro lights, introduce a celebratory and intimate feeling to any outdoor space. Suspended between trees, posts, or architectural elements, these decorative strands of bulbs create an overhead canopy of warm, gentle light. This technique is perfect for defining outdoor "rooms" like patios, decks, and dining areas, making them feel inviting and festive.
This look has become a staple in residential design. It offers one of the most accessible landscape lighting design ideas for instantly adding charm and a sense of occasion. Whether for a quiet family dinner or a lively gathering, festoon lighting provides functional illumination wrapped in a layer of pure ambiance.
Implementation Tips for String Lights
Achieving a professional, durable installation requires more than just hanging a strand of lights. For a polished and long-lasting effect, focus on these details:
- Hanging Height and Drape: Suspend lights between 8 and 10 feet high to allow for comfortable headroom. Create gentle, swooping curves rather than taut, straight lines for a more relaxed and visually appealing drape.
- Color Temperature: To create that signature cozy, nostalgic glow, select warm white LED bulbs (2200K to 2700K). This temperature range mimics the look of classic incandescent bulbs without the high energy use.
- Control and Automation: Install a dimmer switch to adjust the brightness from a functional level to a soft, ambient glow. Connect the lights to a smart plug or timer for automated scheduling.
- Support and Safety: For longer spans, use a galvanized steel guide wire to support the weight of the lights and prevent sagging or strain, especially in windy coastal areas like the Monterey Peninsula.
7. Solar Landscape Lighting
Solar landscape lighting offers an environmentally friendly and wire-free solution, leveraging photovoltaic technology to illuminate your property. These systems use panels to capture sunlight and charge internal batteries during the day, which then power the lights automatically after dusk. Modern advancements have made solar a reliable and powerful option for various landscape applications.
This approach is perfect for remote areas of a property, eco-conscious homeowners, or community gardens where running traditional wiring is impractical. The simplicity of installation and zero ongoing energy costs make it an attractive part of any modern landscape lighting design. In fact, a 2022 survey found that 55% of homeowners prefer energy-efficient lighting features (Source: Houzz).
Implementation Tips for Solar Lighting
To maximize performance and longevity from your solar fixtures, strategic placement and maintenance are key. Consider these specific tips:
- Panel Placement: Position the solar panel to receive at least 6 to 8 hours of direct, unobstructed sunlight daily. Face it south for optimal sun exposure in the Northern Hemisphere.
- Regular Cleaning: Keep solar panels free of dust, pollen, and debris. A simple wipe-down every few months ensures the cells can charge the battery at maximum efficiency.
- Battery Considerations: Choose fixtures with high-quality, replaceable batteries. This extends the life of the unit significantly, as the battery is often the first component to degrade.
- Seasonal Awareness: Shorter winter days, especially along the Central Coast where marine layer can be a factor, will result in shorter run times for your lights. Adjust expectations accordingly.
8. Smart and Connected Lighting Systems
Smart technology revolutionizes landscape lighting design ideas by moving beyond simple on/off switches into a world of dynamic control and personalization. Connected systems integrate your outdoor lights with home automation platforms, allowing for remote operation via smartphone apps or voice commands. This technology offers unprecedented customization, from scheduling and dimming to full-spectrum color changes.
This approach empowers you to adapt your landscape lighting to any mood or occasion effortlessly. You can create sophisticated scenes for entertaining, enhance security with motion-activated presets, or automate daily routines. To truly optimize your smart lighting and overall home energy, consider exploring a complete guide to energy management systems.
Implementation Tips for Smart Lighting
To ensure a seamless and reliable smart lighting experience, focus on a solid technical foundation and thoughtful programming:
- Ensure Strong Wi-Fi: Most smart lighting systems rely on a stable Wi-Fi connection. Before installing, test your signal strength in all areas where you plan to place fixtures and add a mesh network or extender if needed.
- Create Lighting Scenes: Program "scenes" for different activities, such as a "Dinner Party" scene with soft, warm light or a "Security" scene with brighter, motion-triggered illumination.
- Geofencing for Automation: Set up geofencing to automatically turn lights on as you arrive home or off when you leave. This adds a layer of both convenience and security.
- Start Small and Expand: Begin with a starter kit for a key area like the front entryway or patio, and expand your system over time. You can learn more about smart and connected lighting systems to plan your project.
9. Silhouette and Shadow Lighting
Silhouette and shadow lighting is an artistic technique that flips conventional lighting on its head. Instead of illuminating an object directly, this method places a light source behind it to create a dramatic, dark outline against a lit background. It can also be used to cast intriguing shadows onto walls or pathways, transforming ordinary plants or sculptures into mysterious nighttime art.
This advanced approach emphasizes form over detail, adding depth and a sense of drama rarely achieved with other techniques. This is one of the more creative landscape lighting design ideas. It works exceptionally well in modern, contemporary, or minimalist landscapes where shape and structure are key design elements.
Implementation Tips for Silhouette and Shadow Lighting
To master this dramatic effect and avoid a muddled or confusing scene, focus on precise placement and subject selection.
- Fixture Placement: For a true silhouette, place a well or bullet light directly behind the object, aimed at a vertical surface like a house wall or privacy fence. The object itself will remain dark.
- Choose Interesting Shapes: This technique is most effective with plants that have open, intricate branching patterns, like a Japanese Maple or a sculptural succulent. Solid, dense shrubs will just look like a dark blob.
- Balance with Ambient Light: Pure silhouette lighting can feel stark. Combine it with softer, ambient lighting in other areas of the yard to ensure the overall scheme feels balanced and navigable.
- Consider Shadow Play: To create shadows, position the light in front of the object and aim it toward a wall. Experiment with the fixture's angle and distance to stretch or shrink the shadow for different artistic effects.
10. Deck and Patio Integrated Lighting
Integrated lighting seamlessly blends fixtures into the structure of your deck or patio, creating a polished, built-in look that enhances both safety and style. This approach moves beyond standalone fixtures by embedding lights directly into stair risers, railings, posts, and even under countertops. The result is a clean, sophisticated ambiance perfect for outdoor entertaining and dining.
This method is one of the most effective landscape lighting design ideas for defining outdoor "rooms" and ensuring they remain functional after dark. By illuminating pathways and level changes, it greatly improves safety while adding a high-end, resort-like feel. For a deeper dive into creating the perfect outdoor atmosphere, you can learn more about patio lighting ideas on homelighterinc.com.
Implementation Tips for Integrated Lighting
Achieving a flawless, integrated system requires careful planning, especially if you are renovating or building a new outdoor space.
- Plan Ahead: The most crucial step is to plan your electrical rough-in during the construction phase of your deck or patio. Retrofitting can be significantly more complex and expensive.
- Safety First: Prioritize safety by installing lights on all step risers. This clearly marks changes in elevation, preventing trips and falls in low-light conditions.
- Create Ambiance: Use a warm white LED (2700K) for dining and seating areas. This color temperature creates a cozy, inviting glow that is comfortable for conversation and relaxation.
- Even Spacing: For railing or post cap lights, space fixtures approximately 6 to 8 feet apart. This provides consistent, even illumination without creating harsh bright spots or dark zones.
How The Home Lighter Can Help
A well-designed landscape lighting plan transforms your property. It weaves together various elements—accent lighting for a sculpture, moonlighting through trees, and integrated deck lighting for social areas. This multi-layered strategy adds depth, dimension, and a professional polish that elevates your entire home.
For homeowners in Monterey, Santa Cruz, or Salinas, selecting fixtures built to withstand coastal conditions is paramount. Materials like brass, copper, and marine-grade aluminum offer longevity against salt air and humidity, protecting your investment for years to come. Our lighting consultants specialize in selecting the right products for the Central Coast climate.
Feeling inspired? The best way to begin is by taking a walk around your property at dusk. Sketch a simple map of your yard and start noting potential locations for the different lighting techniques we've discussed.
Ready to turn your vision into a brilliant reality? The experts at The Home Lighter Inc. specialize in transforming properties across the Monterey Peninsula with custom landscape lighting solutions. Visit our showroom or contact us today to get personalized guidance on fixture selection, design planning, and bringing your unique landscape lighting design ideas to life.
Frequently Asked Questions (FAQs)
What is the best color temperature for landscape lighting?
For most residential landscape lighting, a warm white color temperature between 2700K and 3000K is ideal. It creates a welcoming, sophisticated ambiance that enhances the natural colors of plants, stone, and architectural materials without feeling harsh or artificial.
How do I avoid creating light pollution or bothering my neighbors?
Use high-quality, directional fixtures with built-in glare shields or shrouds. Aim lights carefully at their intended target, such as a tree canopy or pathway, and avoid aiming them upward into the sky or sideways toward neighboring properties. Using timers and dimmers also helps manage light output.
Are LED landscape lights worth the investment?
Absolutely. LEDs use up to 80% less energy than traditional halogen bulbs, significantly lowering electricity costs. According to the U.S. Department of Energy, quality LEDs can last 25 times longer, drastically reducing maintenance and replacement needs, which saves you money over the long term.
Can I mix solar and low-voltage lighting in my design?
Yes, you can. A hybrid approach is often very practical. Use low-voltage wired lighting for critical areas that need consistent, powerful illumination, like entryways and architectural features. Solar lights are excellent for adding accents in remote parts of the yard, like a back garden or fence line, where running a wire would be difficult.
What materials are best for fixtures in coastal areas like Monterey or Santa Cruz?
In coastal environments with salt air, it's crucial to choose fixtures made from corrosion-resistant materials. Solid brass and copper are top choices because they develop a natural patina over time and do not rust. Marine-grade powder-coated aluminum is another durable and effective option.