Changing a standard on/off switch to a dimmer is a small upgrade that makes a big difference. It can completely change a room's mood, help you save on energy bills, and even make your light bulbs last longer. Learning how to install dimmer switches is a manageable project for most homeowners, turning a basic space into something much more flexible.
Why Dimmers Are a Smart Upgrade for Your Home
A dimmer switch does more than just lower the lights; it gives you total control over your home's atmosphere. Think of it as painting with light—you can create the perfect setting for any occasion. For those of us on the Monterey Peninsula, that might mean softening the bright coastal sun in the afternoon or creating a cozy glow on a foggy evening.
This simple change also brings practical benefits that go beyond just looks. There's a good reason installing dimmer switches is one of the most popular home upgrades.
The Real Value of a Dimmer Switch
You don't have to take our word for it—the numbers show how popular dimmers have become. The global market for switches and dimmers hit $15.2 billion in 2023 and is expected to grow to $26.8 billion by 2033. Much of that growth comes from the demand for smart home features and better energy efficiency. You can read more about these market trends in lighting technology to see where the industry is headed.
Here’s a quick summary of the main advantages of adding dimmers:
- Total Atmosphere Control: You can go from bright, functional lighting for tasks to a soft, relaxing mood in seconds. This is perfect for dining rooms, living areas, and bedrooms.
- Real Energy Savings: It's simple—when you dim your lights, you use less electricity. Dimming your lights by just 25% can cut your lighting energy costs by about 20%.
- Longer Bulb Life: Using a light bulb at a lower intensity puts less stress on its parts. This one change can make your bulbs last up to 20 times longer.
By giving you full control over light levels, dimmer switches let you instantly customize how a room functions and feels. It’s a small electrical project that delivers a huge return in daily comfort.
Choosing the Right Dimmer and Gathering Your Tools
Before you touch any wires, the secret to a smooth installation is good preparation. Getting the right switch for your specific setup and having the proper tools ready is key.
Let’s start with the dimmer itself. You'll generally find two types: single-pole and three-way. If one switch is the only thing controlling a light, you need a single-pole dimmer. If two switches control the same light—like at the top and bottom of stairs—you’ll need a three-way model.
Matching Your Dimmer to Your Bulbs
This is where many people make a mistake. You can't assume any dimmer will work with any bulb, especially modern LEDs. If you pair a new, dimmable LED bulb with a dimmer made for old incandescent bulbs, you'll likely have problems like flickering or buzzing.
Always check the packaging. Look for dimmers clearly labeled "LED+," "CFL/LED compatible," or something similar. Then, make sure your LED bulbs are also marked as "dimmable," because many are not.
A quality, compatible dimmer is the key to a professional-feeling installation. It prevents the annoying flicker and buzz that can ruin the ambiance you’re trying to create.
If you're planning a bigger project, like connecting lights to a smart home system, professional advice is a smart move. Exploring your options for smart home lighting installation can help you create a seamless lighting environment.
To help you sort through the options, here's a quick guide to choosing the right dimmer switch.
Dimmer Switch Compatibility Guide
Choosing the right dimmer can feel overwhelming. This table breaks down the most common types to help you match a switch to your wiring and light bulbs.
| Dimmer Type | Best For | Compatible Bulbs | Common Use Case |
|---|---|---|---|
| Standard Rotary/Slide | Incandescent & Halogen Bulbs Only | Incandescent, Halogen | Older homes with traditional lighting; not recommended for new LED installs. |
| CFL/LED (CL) Dimmers | LED & CFL Bulbs | Dimmable LEDs, Dimmable CFLs, Halogen, Incandescent | The modern standard for most homes. Perfect for updating rooms with energy-efficient bulbs. |
| Electronic Low Voltage (ELV) | Fixtures with an ELV transformer | ELV-compatible LEDs, Halogen | High-end track lighting, under-cabinet lights, or recessed fixtures with electronic transformers. |
| Magnetic Low Voltage (MLV) | Fixtures with an MLV transformer | MLV-compatible LEDs, Halogen | Outdoor landscape lighting or older track lighting systems with magnetic transformers. |
| Smart Dimmers | Smart home integration | Varies by model – check specs | Controlling lights with your voice, phone app, or setting automated schedules. |
Getting this part right is crucial. A CL dimmer is usually the safest bet for most modern homes, but always double-check your light fixture's requirements if you're unsure.
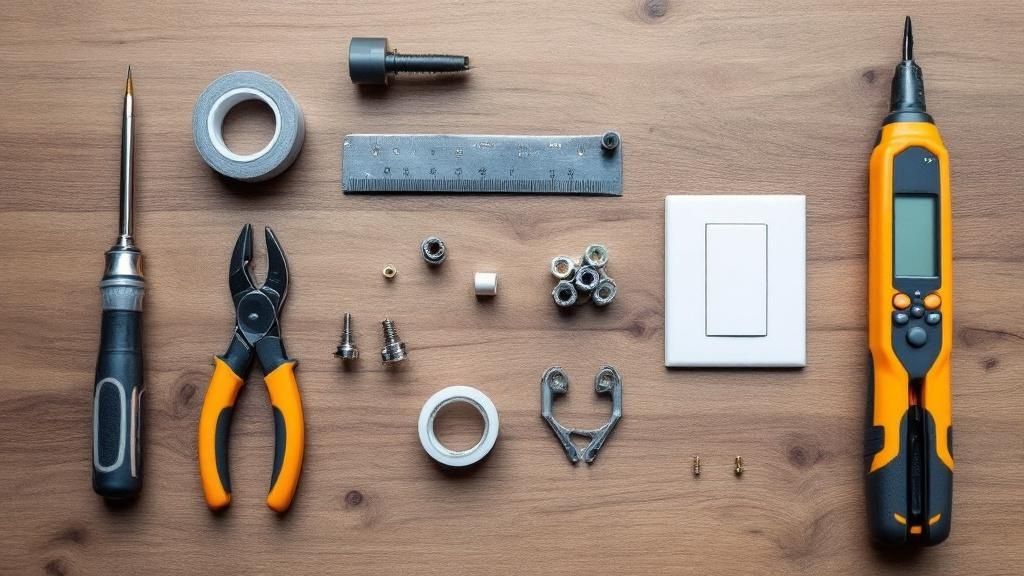
Your Essential Toolkit for the Job
You don’t need a huge toolbox for this project, but a few items are absolutely necessary for doing it safely. Having these ready will save you time and frustration.
Here's your checklist:
- Non-Contact Voltage Tester: This is your most important safety tool. It confirms the power is 100% off before you touch any wires.
- Screwdrivers: You’ll want both a Phillips head and a flathead screwdriver.
- Wire Strippers/Cutters: These are essential for trimming and stripping wire insulation for a clean, secure connection.
- Pliers: A simple pair of needle-nose pliers makes it easier to bend and move wires inside a crowded electrical box.
With the right dimmer and your tools ready, you’re all set for the main event.
The Safe Way to Install Your New Dimmer Switch
Now the real work begins. Installing a new dimmer switch is a straightforward job, but safety must be your top priority. You must be 100% sure the power to the circuit is turned off.
First, go to your main electrical panel and shut off the correct circuit breaker. This is not optional. Once it's off, you can put a piece of tape over it to prevent someone from accidentally turning it back on.
Confirming the Power Is Off
With the breaker off, use your non-contact voltage tester to make sure there's no power at the switch. Unscrew the faceplate from the old switch and bring the tip of your tester near the wires. If it doesn't light up or beep, you're safe to proceed.
Safety First: Never assume a circuit is off just because you flipped a breaker. Always double-check with a voltage tester before you touch a single wire. This step takes only seconds and is the most important part of the job.
Removing the old switch plate is the first step and reveals the wiring you're about to upgrade.

As you can see, this is the first physical step. Accessing the electrical box is where the fun starts.
Removing the Old Switch
Now that you've confirmed the power is off, you can safely remove the old switch. Unscrew the two mounting screws holding the switch to the electrical box. Gently pull the switch straight out, being careful not to pull on the wires.
The wires are attached to screw terminals on the sides of the switch. Loosen those screws, and the wires will come free.
Identifying Your Wires
Inside the box, you'll see a few different colored wires. Knowing what each one does is key to installing your dimmer correctly. Here's what you'll typically find:
- Hot Wire (Black): This wire brings power from the electrical panel to the switch.
- Load Wire (Black or Red): This wire takes power from the switch out to the light fixture.
- Neutral Wire (White): These are usually bundled together in the back of the box. Most basic dimmers don't need a neutral connection, but many smart dimmers do.
- Ground Wire (Bare Copper or Green): This is your safety wire. It connects to the metal electrical box and the switch.
For a simple single-pole switch, the two black wires are often interchangeable on the new dimmer, so you don't have to worry too much about telling them apart.
Connecting Your New Dimmer Switch
Your new dimmer will have wire leads instead of screw terminals. You’ll use wire nuts (included in the package) to connect them to the wires in the wall.
- Connect the Ground Wire: Start by connecting the green or bare copper wire from your dimmer to the ground wire(s) in the box.
- Connect the Hot and Load Wires: Next, connect the two black wires from the dimmer to the hot and load wires in the box.
- Secure with Wire Nuts: Twist a wire nut clockwise over the exposed ends of the wires until it’s snug. Give each wire a gentle tug afterward to make sure it's secure.
If you ever tackle a bigger project, it's good to understand the basics. Our guide explains how to wire a light fixture and covers concepts that are useful for many home electrical jobs.
Once all connections are tight, carefully fold the wires back into the electrical box. Screw the new dimmer into place, attach the faceplate, and you're ready to test your work.
Why Dimmers Are a Smart Home Investment
A dimmer switch is more than a design choice; it's a smart financial and environmental decision. By adjusting the flow of electricity, you directly lower your energy use. That simple change leads to smaller utility bills and a more sustainable home.

This focus on efficiency is driving innovation in lighting control, from standard slide dimmers to smart systems you can manage from your phone. For homeowners on the Central Coast who value sustainability, installing dimmers is an easy and effective step toward a more energy-conscious home.
The Financial and Environmental Benefits
The main benefit of a dimmer is simple: using less energy saves money. When you lower a light's brightness, you're not just creating a mood—you're cutting down on wasted electricity.
This also has a positive effect on the environment. Lowering your home’s electricity use shrinks its carbon footprint, a priority for many in our communities from Monterey to Santa Cruz.
Another benefit is bulb longevity. Running a bulb at a lower intensity can extend its life by up to 20 times. This means fewer replacements and less waste.
Market Growth and Smart Home Integration
The global dimmer switch market was valued at around $9.5 billion in 2023 and is projected to more than double to $20 billion by 2032. This growth is fueled by rising energy conservation awareness and the integration of smart home technologies.
For many homeowners, the initial appeal of a dimmer is style, but its long-term value lies in efficiency. It's one of the few home upgrades that pays for itself through energy savings.
This trend is also tied to the rise of smart homes. Today’s dimmers offer much more than manual control:
- App Control: Adjust lighting from anywhere using your smartphone.
- Voice Commands: Integrate with systems like Alexa or Google Assistant for hands-free control.
- Scheduling: Set your lights to dim automatically at certain times.
At The Home Lighter, we help clients explore modern lighting solutions. If you're interested in making your home smarter, check out our guide to energy-efficient lighting solutions for more ideas.
Troubleshooting Common Dimmer Switch Problems
Even with a perfect installation, you might run into issues. If your new dimmer switch isn't working as expected, don't worry. The fix is usually simple.
Nine times out of ten, the problem is an incompatible light bulb. This is the top reason for flickering, buzzing, or uneven dimming. Before you do anything else, check your bulbs. Make sure they are marked as "dimmable" and that your dimmer is designed for that type of bulb (LED, CFL, etc.).
Why Is My Dimmer Flickering or Buzzing?
An annoying flicker or hum is almost always a sign of an incompatibility or a loose connection. The buzzing sound is often the bulb's filament vibrating or the switch struggling to control the electrical current for a bulb it doesn't recognize.
Here’s what usually causes the trouble:
- You Have the Wrong Bulb: Trying to dim a non-dimmable bulb is a classic mistake that won't work correctly.
- Mismatched Technology: Older dimmers were built for simple incandescent bulbs and often can't handle the electronics in modern LEDs.
- A Loose Connection: A wire nut that isn't tight enough can cause power to flow unevenly.
- An Overloaded Dimmer: Every dimmer has a maximum wattage rating. If you connect too many bulbs, it may overheat and perform poorly.
Pro Tip: The fastest way to troubleshoot is to swap one bulb. Try a different brand of high-quality, dimmable LED. If the problem stops, you've found the cause without opening the switch box.
Fine-Tuning Your Dimmer for Perfect Performance
If you've confirmed your bulbs are correct, what's next? Many modern dimmers have a small adjustment dial hidden behind the faceplate. This lets you fine-tune the dimming range to match your specific bulbs, which can eliminate flickering at low light levels.
To adjust it, turn off the power at the breaker again. Pop the faceplate off and look for a small dial or slider. Move it slightly, turn the power back on, and test it. A little calibration is often all it takes.
Learning to avoid the most common home lighting mistakes can save you a lot of headaches. If you’ve tried these steps and still have issues, it may be time to call a professional.
FAQs: Your Dimmer Switch Questions Answered
Here are answers to some of the most common questions people ask after installing a dimmer switch.
Can I install a dimmer on any light fixture?
Not quite. Most standard incandescent and halogen fixtures work with dimmers, but some specialized lighting needs a specific type of control. For example, some ceiling fans or low-voltage track lighting systems require a dimmer designed specifically for them. Always check the manufacturer's instructions for both the light fixture and the dimmer before you start.
Do I really need a special dimmer for LED bulbs?
Yes, you absolutely do. This is very important. LEDs use different technology and require a dimmer built for them, usually labeled LED+ or CFL/LED compatible. Using an old dimmer with LED bulbs is the number one cause of flickering and buzzing. Also, make sure your LED bulbs themselves are marked "dimmable."
What's the difference between a single-pole and a three-way dimmer?
It depends on how many switches control a single light. A single-pole dimmer is for a light controlled from just one spot, like in a bedroom. A three-way dimmer is for a light controlled from two separate locations, like at the top and bottom of a staircase. The wiring is different, so be sure to buy the right type.
Why is my new dimmer switch warm to the touch?
It's normal for a dimmer switch to feel slightly warm when it's on. The electronics inside create a small amount of heat as they work. However, if the switch feels hot, it could be a sign of a problem, like an overload. An overload means the total wattage of the bulbs exceeds the dimmer's maximum rating. If it's uncomfortably hot, turn off the power and double-check your wiring.
Does installing a dimmer switch actually save money?
Yes, it does. By reducing the power sent to your light bulbs, dimmers lower your electricity use. Dimming lights by 25% can save you around 20% in energy costs. Dimmers also extend the life of your bulbs, so you'll replace them less often. This combination of energy savings and longer bulb life makes dimmers a smart investment. You can even explore the best smart home lighting systems for more convenience and efficiency.
Ready to transform your home's lighting? The experts at The Home Lighter Inc. can help you choose the perfect dimmer switches and fixtures to create the ideal atmosphere in any room. Visit our Pacific Grove showroom or get in touch with our design consultants today.