A well-lit kitchen is the heart of any home on the Monterey Peninsula. It works for historic Victorians in Pacific Grove and modern coastal retreats in Carmel. But getting that perfect glow is about more than just picking pretty fixtures; it's about smart placement.
Proper lighting turns your kitchen into a warm, inviting space for cooking and gathering. It gets rid of shadows on your countertops, highlights your home's design, and sets the right mood. This guide is based on hundreds of consultations we've done right here on the Central Coast.
We'll share our proven tips for the perfect placement: recessed kitchen lighting tips that work for our region's homes, including those with vaulted or beamed ceilings. This isn't generic advice. These are real-world tips from kitchens like yours. Once your lights are in, remember that cleaning your light fixtures like a pro keeps them shining bright.
1. Follow the Proper Spacing Formula
The first step to perfect kitchen lighting is using a simple math formula. This prevents uneven light, so you won't have dark corners or overly bright hot spots. It creates a smooth layer of light for your whole kitchen.
The Core Calculation
The rule is easy: divide your ceiling height by two. The answer tells you how far apart to space each recessed light. This makes sure the light from each fixture overlaps just right, lighting up the whole room evenly.
For example, a typical Monterey kitchen with an 8-foot ceiling needs lights spaced 4 feet apart. A home in Carmel with a 10-foot ceiling would need lights spaced 5 feet apart for a balanced look.
Putting the Formula into Practice
This formula is a great start, but you'll need to make small adjustments. You have to think about the distance from walls and cabinets, not just between the lights.
- Distance from Walls: Place your first row of lights about 24-30 inches from the walls. This stops ugly shadows, called "scalloping," from appearing on your walls.
- Cabinet Placement: To light your counters well, line up the center of the recessed lights with the edge of the countertop. This makes the light fall on your workspace, not behind you.
- Work Zones: For busy spots like over the sink, you can place the lights a bit closer together. This gives you brighter, more focused light for tasks.
This infographic shows the main ideas of the spacing formula.
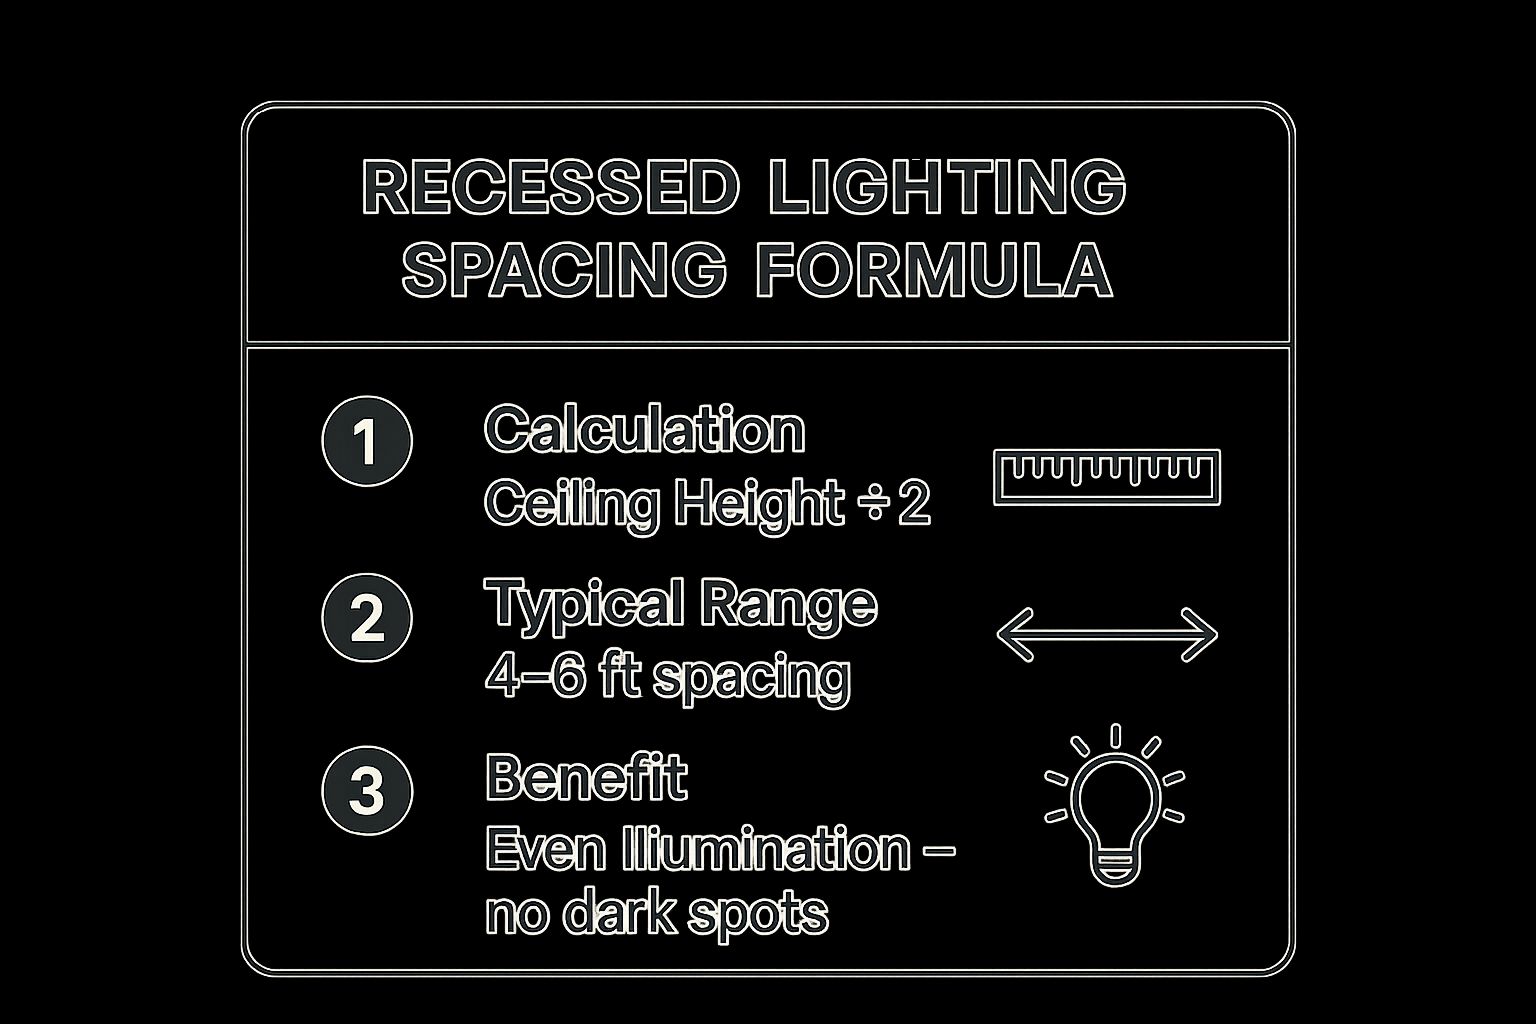
As you can see, this formula is key to getting even light without guessing. Planning your layout with this math gives you a professional-grade lighting foundation.
2. Position Lights 18-24 Inches from Walls
Where you place lights in relation to your walls is a critical detail. This specific measurement helps light up your countertops and stops harsh shadows on your cabinets. It makes your task areas bright and washes your walls with soft, welcoming light.
The Core Calculation
The standard rule, proven in hundreds of kitchens from Pacific Grove to Carmel, is to place recessed lights 18 to 24 inches away from the wall. You measure from the wall to the center of the light. This aims the beam right onto the front edge of your countertops, where most prep work happens.
Placing lights too close to the wall creates an ugly scalloping effect on your backsplash. Placing them too far away means you'll cast a shadow over your own workspace.
Putting the Formula into Practice
This 18-to-24-inch rule is a great starting point for any kitchen. It helps light up your key features, whether you have a modern backsplash or traditional glass-front cabinets.
- Measure Correctly: Always measure from the wall to the center of the light, not its edge. This ensures the light beam lands in the right spot.
- Adjust for Cabinet Depth: Standard upper cabinets are 12 inches deep, so this placement is ideal. If you have deeper cabinets, aim for the 24-inch side of the range.
- Highlight Features: This placement is perfect for showing off a beautiful tile backsplash or items in glass cabinets. In many Carmel kitchens, we use this trick to make cabinets a decorative feature.
- Use Adjustable Trims: For more control, consider adjustable "gimbal" trims. These let you aim the light to perfectly hit your workspace or highlight a design element.
3. Layer Task Lighting Over Islands and Work Zones
A general grid of lights is a good start, but your kitchen's work zones need special attention. Many people make the mistake of using the same lighting over islands and sinks, which can be frustrating. Layering dedicated task lighting makes these busy areas bright and safe.
The Core Calculation
Task lighting is about focus, not wide coverage. For these zones, a tighter spacing of 24 to 30 inches apart is best. This closer placement creates a bright pool of light, getting rid of shadows so you can see what you're doing.
A large kitchen island in a Carmel home might have four recessed lights spaced 30 inches apart for a bright prep surface. A sink area could have two lights on either side of the faucet. This is one of the best tips for perfect recessed kitchen lighting.
Putting the Formula into Practice
To use this idea, think about how you use your kitchen. It's more about planning by zone than sticking to a rigid grid. Here are a few tips from our local consultations.
- Avoid Casting Shadows: Place island lights directly over the counter's edge, not the walkway. This stops your body from blocking the light.
- Illuminate the Sink: Put lights slightly in front of the sink, not directly over it. This angle ensures the light shines into the basin for cleaning.
- Account for Pendants: If you have decorative pendant lights over an island, place your recessed lights around them. This adds task lighting without making it look cluttered.
- Focus the Beam: For task areas, choose lights with a narrower beam angle (around 30-40 degrees). This focuses the light right on your work surface.
4. Select the Right Trim Size and Style
The look and function of your recessed lights are very important. Choosing the right trim size and style helps your fixtures match your kitchen's design. This choice affects everything from glare to how the light spreads.
Size Matters
The two most common sizes for kitchen recessed lights are 4-inch and 6-inch. The right choice depends on your ceiling height and the effect you want.
A classic Pacific Grove kitchen with 8-foot ceilings would look great with 4-inch trims. They provide a modern, focused light. A Carmel home with high, vaulted ceilings is a better fit for 6-inch trims, as they spread light over a larger area.
Putting Trim Selection into Practice
The trim style affects how the light looks and works. The right style is key for a beautiful and functional kitchen.
- Baffle Trims: These are very popular. Their grooved insides reduce glare, which is important if you have stainless steel appliances or shiny counters.
- Reflector Trims: These have a smooth, shiny inside to maximize light output. They are great for areas where you need bright, unfiltered light, like a prep zone.
- Adjustable Trims: Also called "gimbal" trims, these let you aim the light. Use them to highlight a backsplash, artwork, or other features.
- Matching Finishes: For a clean look, match your trim finish to other metals in your kitchen, like cabinet handles. Many modern kitchens use simple white trims that blend into the ceiling.
Thinking about size and style ensures your lighting is a smart design choice. If you're upgrading older fixtures, learn more about replacing fluorescent lights in the kitchen.
5. Choose Color Temperature Strategically
The color of the light itself is just as important as where you put the fixtures. Color temperature is measured in Kelvin (K). It determines if your light looks warm and yellow or cool and blue.
The Core Calculation
For homes, the Kelvin scale usually goes from 2700K to 5000K. Lower numbers mean warmer light, while higher numbers mean cooler light. The trick is to match the light temperature to the mood you want.
For a family kitchen in Santa Cruz, a 3000K warm white is a great all-around choice. For a chef's kitchen in Monterey, you could use 3000K for general lighting and a brighter 4000K neutral white for task areas like the island.
Putting the Formula into Practice
When choosing a color temperature, think about your kitchen's colors and how you use the space. It’s not a one-size-fits-all decision.
- Warm and Cozy (2700K-3000K): This range is great for traditional kitchens with wood cabinets. A 2700K light creates a cozy, inviting glow.
- Balanced and Modern (3500K): For modern kitchens with white or gray cabinets, a 3500K light offers a clean, neutral look. It shows colors accurately without being too harsh.
- Crisp and Functional (4000K): This is best for task areas. 4000K light is bright and clear, making it easy to chop vegetables or read recipes.
It's also important to choose lights with a high Color Rendering Index (CRI) of 90 or more. A high CRI means the colors of your food and cabinets will look true and vibrant.
6. Account for Dimming Capabilities and Controls
Perfect placement is only half the battle. To truly control your kitchen's atmosphere, you need dimmers. Dimmers let your lights go from bright task lighting to a soft, ambient glow for entertaining.
The Core Calculation
The main idea is to create different lighting zones, each with its own dimmer. Your kitchen has many uses, so your lighting should be flexible. You can separate your perimeter lights, island lights, and under-cabinet lights onto different controls.
For example, a Pacific Grove kitchen might have three zones. The main lights are on one dimmer, the island lights on another, and accent lights on a third. This lets you create the perfect light for any activity.
Putting the Formula into Practice
A good dimming plan needs the right parts. Not all fixtures and dimmers work well together, especially with LEDs.
- Choose Compatible Parts: Make sure your LED fixtures are marked as "dimmable." Use them with a dimmer switch made for LEDs to avoid flickering or buzzing.
- Establish Multiple Zones: For any kitchen over 150 square feet, plan for at least two dimming zones. A common setup in Carmel homes is to put general lighting on one circuit and task lighting on another.
- Embrace Smart Controls: Smart dimmers let you use an app or your voice to control the lights. You can create preset scenes like "Cooking" or "Dining" to change the room's mood with one tap.
Dimmers are a key part of perfect lighting placement, giving you the power to shape your kitchen's environment.
FAQs about Recessed Kitchen Lighting
What is the best spacing for recessed lighting in a kitchen?
A good rule of thumb is to divide your ceiling height by two. For an 8-foot ceiling, space your lights 4 feet apart. This creates even, general lighting without dark spots.
How far should recessed lights be from kitchen cabinets?
Place them 18 to 24 inches from the wall. This placement ensures the light shines directly onto your countertops, right where you do your prep work, instead of behind you.
What size recessed lights are best for a kitchen?
4-inch and 6-inch lights are the most popular. Use 4-inch lights for standard 8-foot ceilings for a modern look. For taller or vaulted ceilings, like many in Carmel, 6-inch lights provide better coverage.
What color temperature (Kelvin) should I use for my kitchen?
A 3000K warm white is a great all-around choice for a welcoming feel. For task areas like islands and sinks, a 4000K neutral white provides crisp, clear light that is great for detailed work.
Should I put my kitchen recessed lights on a dimmer?
Absolutely! Dimmers add incredible flexibility. They allow you to adjust the brightness for different activities, from bright task lighting for cooking to a soft glow for dining or relaxing.
Bring Your Vision to Light with The Home Lighter
Mastering recessed lighting is about understanding why each placement matters. A perfectly lit kitchen is built on smart layers, careful spacing, and the right fixtures. Moving beyond a simple grid is the first step toward a design that feels both beautiful and easy to use.
Recapping the main ideas can help you plan:
- Spacing is your foundation: Divide your ceiling height by two to find the ideal distance between lights.
- Placement is about function: Put lights 18-24 inches from cabinets to light up your counters and avoid shadows.
- Layering creates depth: Use recessed lights for general lighting, and add task lights and decorative fixtures to elevate the design.
- Details make the difference: The right trim, color temperature, and dimmers control the mood and function of your space.
Getting the perfect placement for recessed kitchen lighting takes a mix of technical knowledge and creative vision. The goal is a space that looks great and supports everything you do there. These tips, based on hundreds of projects on the Monterey Peninsula, will help you make smart choices.
Ready to transform your kitchen with a lighting plan designed just for you? The team at The Home Lighter Inc. specializes in creating beautiful, functional lighting for homes across the Central Coast. Schedule a consultation or visit our Pacific Grove showroom to see how expert guidance can perfect your lighting placement.