Replacing your kitchen's old fluorescent lights is a great upgrade. This project can boost your home's value and lower your energy bills right away. Modern LED lights also get rid of the annoying flicker and hum from old fixtures. They offer better light and make your kitchen a more inviting place.
Why Upgrading Your Kitchen Lighting Is a Bright Idea
Let's be honest, that old, buzzing fluorescent box in your kitchen has seen better days. For many homes on the Monterey Peninsula, the kitchen is the center of family life. The right lighting makes all the difference.
Getting rid of harsh fluorescent light can change the room from just a workspace to a warm, welcoming space. But replacing fluorescent lights is not just about looks; it's a smart investment. Old fluorescent bulbs are not efficient and cast a cool glow that makes food look dull.
The Real Benefits of a Modern Upgrade
When you switch to modern lights, the improvements are clear. This change is about more than just a new light on the ceiling.
- Better Light Quality: Modern LEDs show true colors. This means everything from your cabinets to your food will look vibrant and natural. It makes tasks like chopping vegetables safer and more pleasant.
- A Better Atmosphere: Say goodbye to sterile, buzzing kitchen light. New fixtures, especially with dimmers, let you set the mood. You can have bright light for cooking or a soft glow for a quiet evening.
- More Energy Efficiency: LEDs are popular for a reason. In 2023, LED lighting made up over 65% of sales in the kitchen lighting market because of its efficiency. This means lower electricity bills for you. You can learn more about the kitchen lighting market shift on GrandViewResearch.com.
For homeowners, this is a big deal. Upgrading saves you money and improves daily life in your most-used room. We have a guide on energy-efficient lighting solutions that can help you choose.
Choosing Your New Kitchen Lighting Fixture
Once you decide to replace your old fluorescent lights, the fun part begins: picking a new fixture. The goal is to find something that improves your kitchen's style and provides the right light for all your needs. Your choice will depend on your ceiling height, kitchen layout, and personal style.
Many homeowners like sleek flush mount LED panels for a clean, modern look. These lights sit flat against the ceiling and cover the spot where the old box light was. They provide bright, even light that is perfect for general kitchen tasks.

Different Lighting Options
If you want more control over where your light shines, there are other great options.
Recessed lights, also known as 'can' lights, are a popular choice because they blend into the ceiling. They are great for putting focused light right on your countertops. This can make a kitchen feel bigger and less cluttered.
Another good option is track lighting. Modern track lights look much better than older versions. You can aim multiple light heads exactly where you need them. This is perfect for lighting specific work areas or highlighting features in your kitchen.
Here on the Central Coast, from Santa Cruz to Monterey, it's smart to think about materials. The salty air can be tough on some metals. Look for fixtures with marine-grade or powder-coated finishes that resist moisture and rust.
If you have a kitchen island, this is a great time to add more layers of light. You can pair your new ceiling light with stylish pendants. For ideas, check out our guide on kitchen island lighting ideas.
Comparing Fluorescent Replacement Options
Here is a quick comparison to help you choose a replacement for your old fluorescent light. Think about what works best for your kitchen, skill level, and budget.
| Fixture Type | Best For | Installation Difficulty | Average Cost |
|---|---|---|---|
| LED Flush Mount Panel | General, even light; covering the old fixture's spot. | Easy to Moderate | $50 – $200 |
| Recessed (Can) Lights | Focused light over counters; a clean, minimal look. | Moderate to Difficult | $30 – $100 per light |
| Track Lighting | Flexible, aimed lighting for specific areas. | Moderate | $100 – $300+ |
| Pendant Lights | Decorative lights over islands or sinks. | Easy to Moderate | $75 – $400+ per light |
An LED panel is often the easiest swap. Recessed lights or a track system can give you a more custom, high-end feel.
Preparing for Installation: Tools and Safety
Before you start, let's get ready. Taking a few minutes to gather your tools will make the project go smoothly.
Think of it like cooking. You wouldn't start without a knife and cutting board, right? The same is true here. Having a few key items ready will make this process much easier.
Your Tool Checklist
Gather these tools before you begin. This will help you move from removing the old light to installing the new one without stopping.
- Non-Contact Voltage Tester: This is a must-have. It's the only way to be 100% sure the power is off without touching a live wire. It is your most important safety tool.
- Screwdrivers: You will need both a Phillips head and a flathead screwdriver.
- Wire Strippers/Cutters: These are needed for trimming old wires and preparing them for the new light.
- Pliers: Needle-nose pliers are useful for twisting wires or handling small parts.
- A Sturdy Ladder: Make sure it’s tall enough to work comfortably and safely.
Safety First, Always
Working with electricity requires your full attention. The most important step is shutting off the power correctly.
Go to your circuit breaker panel and find the breaker for your kitchen lights. Flip it to the "OFF" position. Then, use your non-contact voltage tester on the wires at the light fixture. The tester should show no power. This double-check is essential for safety.
Also, wear safety glasses. Dust and debris can fall from an old ceiling fixture. This simple step can prevent injury.
How to Remove the Old Fluorescent Fixture
With your tools ready and the power off, it's time to remove the old light. This part can seem hard, but it's a simple process if you take your time.
First, take off the plastic cover. Be gentle, as old plastic can be brittle. Some covers slide out, while others have clips.
After the cover is off, you will see the fluorescent tubes. Twist each tube a quarter turn and pull it down to remove it.
This picture shows how to take out the old tube lights.
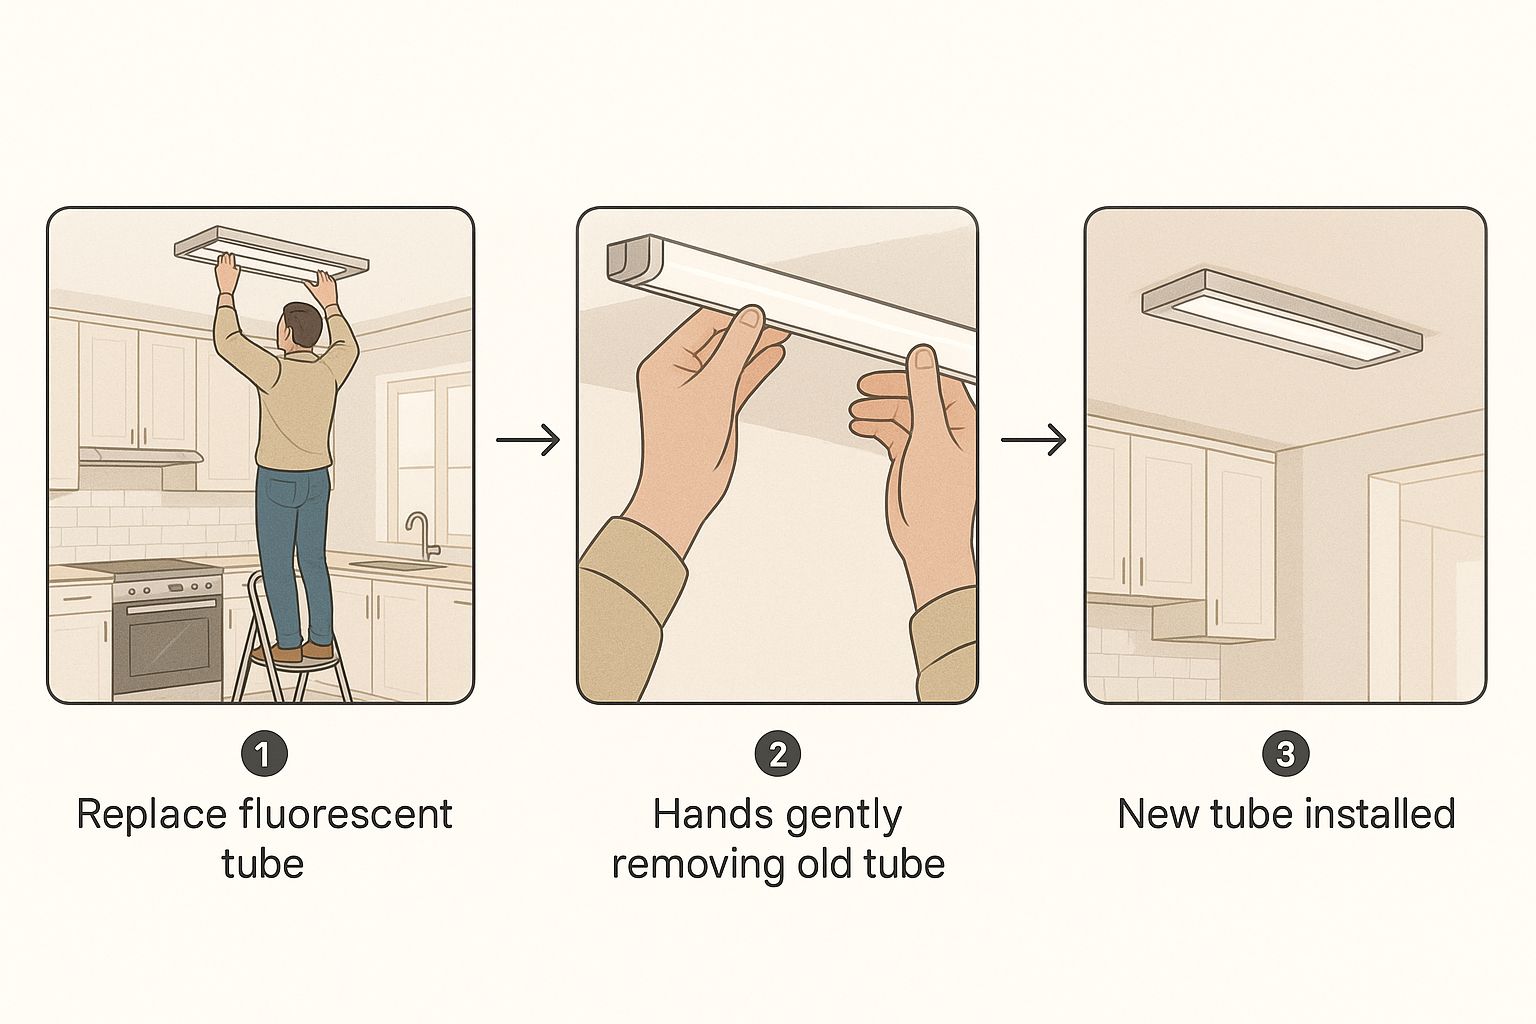
Seeing the steps helps you know how to handle everything safely.
Disconnecting the Wires
Once the tubes are out, remove the metal plate that covers the fixture's wiring. You should see three wires from the ceiling: black (hot), white (neutral), and green or bare copper (ground).
Expert Tip: Before you disconnect anything, take a quick photo of the wiring with your phone. This picture can be a helpful reference later on.
Now, you can disconnect the wires. Unscrew the wire nuts connecting the fixture's wires to the ceiling wires. Start with the black wire, then the white, and finally the ground. If you are new to this, our guide on how to wire a light fixture can help.
With the wires disconnected, only a few screws are holding the fixture up. Ask a helper to support the fixture while you remove the last screws. Lower it carefully, and you are ready for the new light.
Installing Your New LED Kitchen Light Fixture
With the old fixture gone, you have a clean slate. Installing the new LED light is often quicker than removing the old one. This is when your kitchen starts to look new.
First, install the new mounting bracket. Most new lights come with a universal bracket. Screw it into the electrical box in the ceiling to create a secure base for your new light.
Connecting the New Fixture
Now it's time for the wiring. This part is just about matching the colors of the wires.
- Connect the black (hot) wire from the ceiling to the black wire on the new fixture.
- Connect the white (neutral) wire from the ceiling to the white wire on the new fixture.
- Connect the green or bare copper (ground) wire to the ground screw or green wire on the new fixture.
Use wire nuts to connect the matching wires. Gently pull on each connection to make sure it is tight. Tuck the wires into the electrical box.
This upgrade also helps you save energy. The switch to efficient lighting has had a big impact. In the U.S., these changes were saving about 300 billion kilowatt-hours per year by 2018.
Finally, attach the new fixture to the mounting bracket. Follow the manufacturer's instructions for this last step.
You can also add other layers of light for a professional feel. A good under-cabinet lighting installation can make a big difference. Browse our LED lighting fixtures for more ideas.
Final Touches for a Professional Finish
Your new light is up, but don't put the ladder away yet. These last few steps will make your project look even better.
Adding a compatible dimmer switch is a game-changer. An old dimmer switch may cause flickering with new LED lights. Make sure you use a dimmer that is made for LEDs. This gives you full control over the brightness.
Choosing the Right Light Color
Let's talk about color temperature, measured in Kelvin (K). This affects the feel of your kitchen.
- Warm White (2700K-3000K): This is a cozy, inviting light, like old incandescent bulbs. It's perfect for kitchens where you also eat and relax.
- Cool White (3500K-4000K): This light is clean and bright. It's great for task areas like countertops where you prepare food. It helps you see colors clearly.
A well-placed light can make your kitchen much more user-friendly. Good lighting gets rid of shadows where you need to see. Thinking about where you work is key to a successful project.
FAQs: Replacing Fluorescent Lights in the Kitchen
Here are answers to some common questions about upgrading kitchen lights.
Can I just replace fluorescent tubes with LED tubes?
Yes, you can. This is a popular option. The best way is to use direct-wire LED tubes. This means you need to remove the fixture's old ballast, which is a part that helps the fluorescent tubes start. Bypassing the ballast is a good long-term fix, as ballasts often fail over time. It requires some simple rewiring but is a great budget-friendly upgrade.
How much money will I save by switching to LED?
Switching to LED lighting will lower your energy bills. Lighting accounts for about 9% of a typical home's electricity use, and the kitchen is a big part of that. You can read more about residential lighting energy use on ACEEE.org. LEDs use much less energy than fluorescents to produce the same amount of light, saving you money every month.
What should I do if my new LED light flickers?
If a new LED light flickers, the problem is usually an incompatible dimmer switch. Most old dimmers are not designed for the low power of LEDs. The solution is to install a new, LED-compatible dimmer. If you do not have a dimmer switch, turn off the power and check that all your wire connections are tight and secure.
Do I need to hire an electrician for this project?
For many homeowners comfortable with DIY projects, replacing a light fixture is a manageable task. However, safety is most important. If you see old or damaged wiring, or if you feel unsure at any point, it is best to call a professional. For more complex jobs, look for expert lighting contractor services.
How do I choose the best new light for my kitchen?
Choosing the best light depends on your kitchen's size, layout, and style. An LED flush mount panel is a simple replacement for an old box light. Recessed lights are great for task lighting, while track lighting offers flexibility. Our guide on selecting your kitchen lighting can help you explore all your options.
At The Home Lighter Inc., we're here to help you find the perfect lighting solutions for your Monterey Peninsula home. Visit our showroom or schedule a consultation today!