A great recessed lighting layout does more than fill a room with light; it crafts the entire environment. When done right, a well-designed plan uses light to define spaces, highlight your home's best features, and set the perfect mood—from bright and functional to warm and cozy.
This guide provides the expert advice you need to plan your layout like a professional, ensuring every fixture has a purpose.
Beyond Basic Illumination: Why Your Layout Matters
Think of a thoughtful recessed lighting plan as the foundation of great interior design. It moves beyond simple brightness, transforming how you experience your home. This is the difference between a flat, uninspired room and one that feels dynamic, comfortable, and intentional.
The right layout isn't just about seeing better—it's about feeling better in your space.
Many people fall into the trap of placing lights in a simple grid, creating what designers call the "runway effect." This common mistake results in a sterile, uniform look that casts harsh shadows. The secret to a professional result is layering light, and recessed fixtures are your most important tool for building that essential first layer.
The Three Pillars of Lighting Design
A sophisticated lighting plan balances three core functions. The beauty of recessed lights is their versatility; they can play each role depending on placement and fixture choice.
- Ambient Lighting: This is your general, overall light. It fills the room, ensures safe navigation, and sets the base level of brightness. It's the most common function of a recessed lighting layout.
- Task Lighting: This is focused, direct light aimed at a specific spot for activities. Think of lights over your kitchen counters for chopping vegetables or above an armchair for reading.
- Accent Lighting: This is the dramatic layer. You use accent lighting to highlight features you love, like artwork, a textured stone fireplace, or an architectural detail. It adds depth and character.
By strategically combining these three types, your lighting becomes a powerful design element.
A well-executed layout should make a room feel welcoming and functional without you ever noticing the fixtures. The goal is to see the beautiful effect of the light, not the source.
For homeowners on the Monterey Peninsula, getting this right is especially important. Our frequent coastal fog can make interiors feel dim. A smart recessed lighting plan counteracts the grayest days, making your home feel bright and airy year-round—it’s like creating your own indoor sunshine. You can dive deeper into region-specific advice in our complete lighting guide for Monterey homes.
Ultimately, a detailed recessed lighting layout guide is your roadmap. It helps you sidestep common blunders, like placing lights where they’ll cast shadows on your workspace or create glare on your TV screen. Planning ahead ensures every light contributes to a home that looks and feels expertly designed.
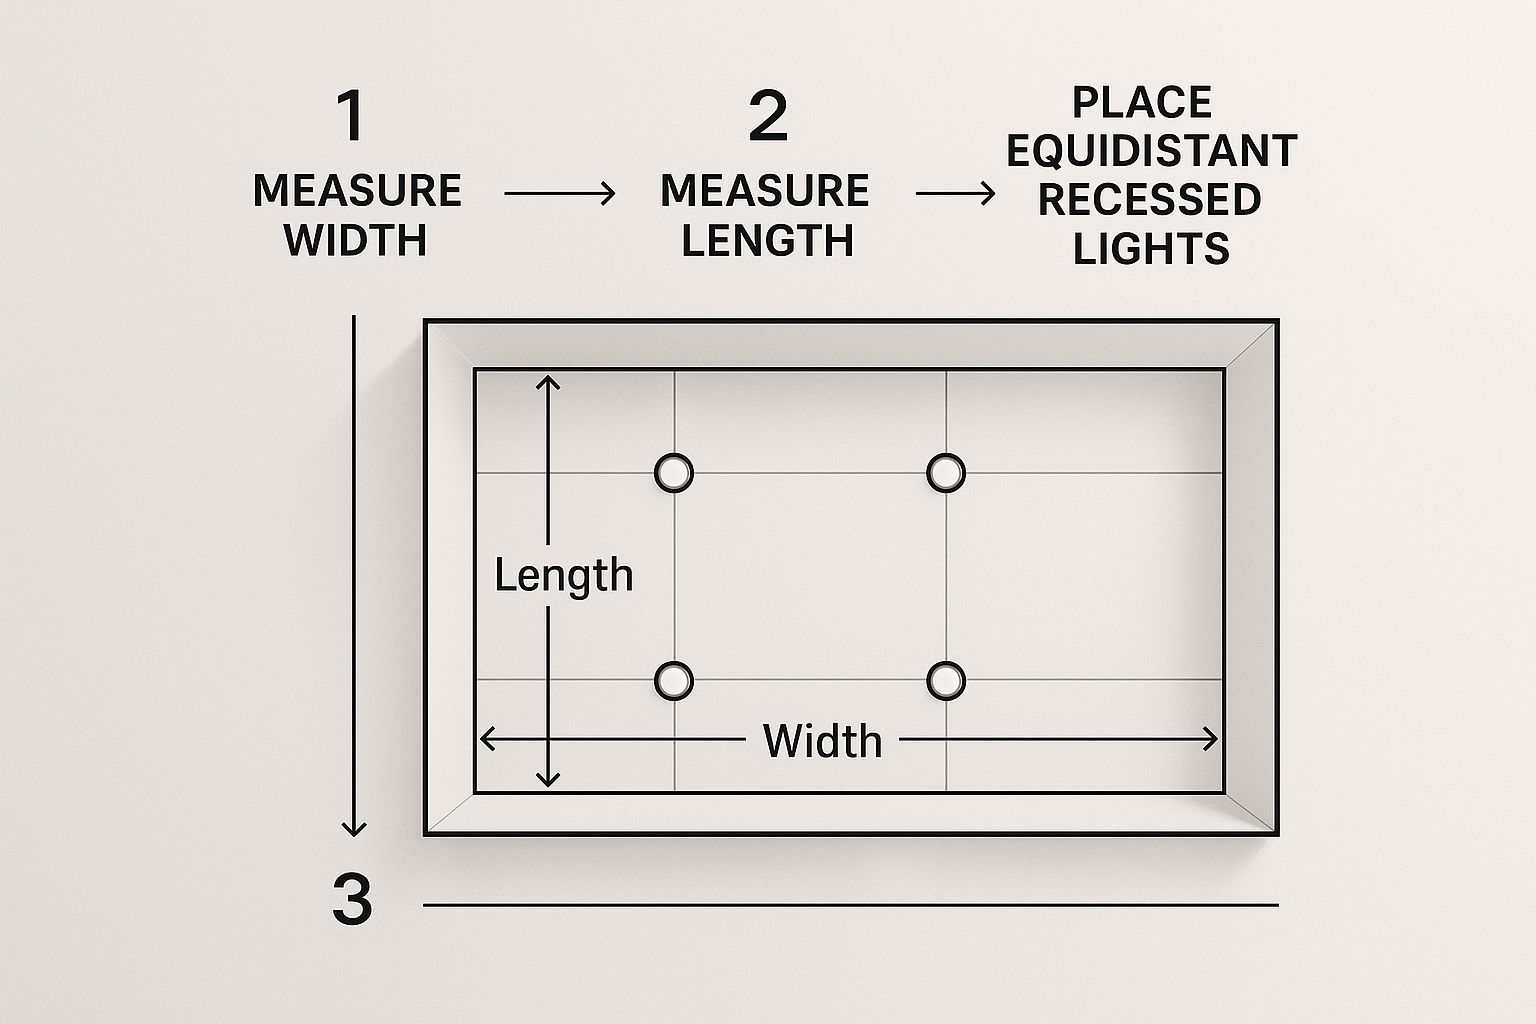
Mastering The Fundamentals Of Light Spacing

This is where we translate your lighting goals into a practical blueprint. Getting the spacing right is what makes a layout feel professional, not like a random collection of lights. Think of it less like a rigid rule and more like understanding the "why" behind the measurements so you can adapt them to your unique space.
The soaring popularity of these fixtures speaks for itself. The global recessed lighting market was valued at USD 33.08 billion in 2023 and is projected to reach USD 84.96 billion by 2032. This growth is driven by the desire for a clean, minimalist aesthetic and the energy savings of modern LED technology. You can see the full analysis in this recessed lighting market research.
The Go-To Spacing Formula
A classic starting point for any recessed lighting plan is a simple formula: ceiling height divided by two. This calculation provides a solid general guideline for the distance between each fixture.
For a standard 8-foot ceiling, you’d space your lights approximately 4 feet apart. For a taller 10-foot ceiling, that distance opens up to 5 feet apart. This math helps create even, overlapping pools of light that prevent dark corners and provide balanced ambient illumination.
But let's be clear: this is just a starting point. A simple grid based only on this formula risks creating that sterile, "airport runway" look. The real artistry comes from adapting this rule to the room’s specific function.
Adjusting Your Layout For Walls And Tasks
Proper spacing isn't just about the distance between lights; it’s also about their relationship to the walls. Placing fixtures too close creates a "scalloping" effect—harsh, cone-shaped patterns on the wall. Place them too far, and the room's perimeter will feel dark and cave-like.
Here’s how to strike the right balance:
- Start Your Grid: As a rule of thumb, place your first row of lights about half the fixture-to-fixture spacing away from the wall. So, if your lights are 4 feet apart, your first row should be about 2 feet from the wall.
- Try Wall Washing: To make a room feel bigger and brighter, intentionally "wash" a prominent wall with light. This involves placing lights closer to the wall (around 18-30 inches) and aiming them toward the surface. It's a fantastic trick for Central Coast homes, brightening the space on overcast days.
- Account for Task Areas: In a kitchen, you don’t want lights centered in the walkways. Instead, place them directly over the edge of your countertops to illuminate your workspace without your body casting a shadow.
Pro Tip: Never center recessed lights in the middle of a room. This common mistake almost guarantees you’ll stand between the light source and your task, creating frustrating shadows on countertops and desks.
Beam Spread And Lumens Are A Big Deal
Not all recessed lights are created equal. Two critical factors that directly impact your spacing are the fixture's beam spread and its lumen output.
The beam spread is the angle of the cone of light it produces. A narrow beam spread (e.g., 40 degrees) is perfect for accent lighting, like spotlighting art. A wide beam spread (90 degrees or more) is better for general ambient light because it covers a larger area.
Likewise, higher lumen fixtures produce more light, which might mean you need fewer of them. This is where a lighting professional can be invaluable—they help you balance these technical specs to ensure you don't over- or under-light your room.
While recessed lights are fantastic, remember to layer your design. You can explore other options in our guide on nine distinct styles of bedroom light fixtures to find complementary pieces.
Room-by-Room Recessed Lighting Strategies
The spacing formulas are a great start, but the magic happens when you tailor the layout to each room. A kitchen's needs are worlds apart from a bedroom's, and a living room demands more flexibility than a hallway. The key is to think about how you actually live in each space.
Every room-specific strategy should support its main purpose. This isn’t about a generic grid; it's about placing lights with intention.
Notice how the layout starts relative to the walls, not the center of the room. This approach is what gives you that balanced, effective illumination.
The Kitchen Layout
As the heart of the home, the kitchen needs a hard-working lighting plan. The top priority is task lighting. You need bright, direct light over your main work areas: countertops, the sink, and the island.
A classic mistake is placing lights down the central walkway. This forces you to stand between the light and your counter, casting a shadow. The best practice is to center recessed lights about 24-30 inches from the wall, so they shine directly over your countertops. This ensures the light falls in front of you, perfectly illuminating your prep space.
The Living Room Layout
Flexibility is the name of the game in the living room. This multi-purpose space handles everything from parties to quiet evenings. A single, static lighting setup won't cut it.
The best approach is creating multiple lighting zones—grouping lights on different switches or dimmers for total control.
- Perimeter Lighting: Placing lights about 2-3 feet from the walls is often most effective. It creates a soft, ambient glow that makes the room feel larger and more inviting.
- Accent Lighting: Add some drama here. Use adjustable "eyeball" or "gimbal" trims to highlight a fireplace mantel, artwork, or bookshelves.
- Task Areas: Have a favorite reading chair? Place a single recessed light directly above it for focused, comfortable light.
As a rule, avoid placing lights directly over seating or the TV to prevent uncomfortable glare. The same ideas about creating inviting zones apply outdoors; get more tips in our guide to outdoor home lighting solutions.
The Bedroom Layout
A bedroom should be your sanctuary. The lighting must reflect that serene atmosphere. Nothing kills the mood faster than harsh overhead lighting, so avoid placing a grid of lights directly over the bed.
Instead, a perimeter-based approach works wonders. Placing recessed lights around the room's edges provides a soft, indirect ambient light that feels calming. It still offers plenty of illumination for getting dressed or cleaning, just without the aggressive glare.
The Bathroom and Shower Layout
Bathroom lighting must be a precise blend of function and ambiance. The most critical area is the vanity. While sconces are the gold standard for shadow-free light, recessed lights can provide excellent supplemental illumination.
If adding recessed fixtures at the vanity, place two slightly in front of where you stand, over the edges of the countertop. This helps you avoid the unflattering shadows cast by a single overhead light. For the shower, a recessed light is a must for safety and cleaning.
It is critically important that any fixture installed in a shower or tub area is wet-rated or damp-rated. A wet-rated fixture is sealed against water and is required for any light placed directly inside the shower enclosure.
To make things even easier, here’s a quick-reference guide.
Recessed Lighting Layout Cheat Sheet by Room
| Room | Primary Goal | Typical Spacing from Walls | Special Considerations |
|---|---|---|---|
| Kitchen | Task Lighting | 24-30 inches (over countertops) | Avoid central placement; use dimmers; highlight islands with pendants. |
| Living Room | Flexibility & Ambiance | 2-3 feet (perimeter lighting) | Create zones; use adjustable trims for accents; avoid glare over seating/TV. |
| Bedroom | Relaxation & Serenity | 2-3 feet (perimeter lighting) | Avoid lights directly over the bed; focus on soft, indirect ambient light. |
| Bathroom | Task & Safety | Over counter edges (vanity) | Use wet-rated fixtures in showers; place vanity lights to avoid shadows. |
Think of this table as a starting point. Following these room-specific principles will put you on the right track to a professional-quality lighting layout.
Choosing the Right Fixtures for Your Plan
A brilliant layout is only half the battle; the fixtures you choose bring that plan to life. This is where we move from blueprint to hardware. Picking the right gear ensures your lighting performs exactly as you envisioned.
For a new build or a major remodel with open ceilings, you’ll use new construction housings. These mount directly to ceiling joists before drywall goes up. If you're upgrading an existing room, you’ll want remodel housings. These are installed from below through a hole in the ceiling, using clips that grab the drywall.
Understanding Housing and Trim Types
A critical factor is the housing's safety rating. An IC-rated (Insulation Contact) housing can be safely buried in ceiling insulation. A non-IC rated housing must be kept at least three inches away from any insulation to prevent a fire hazard. Given California's focus on energy efficiency, choosing IC-rated fixtures is almost always the smartest path.
Once you have the right housing, it's time to pick the trim—the part you actually see.
- Baffle Trim: A popular choice with a ribbed interior that absorbs stray light and cuts down on glare. It's an excellent go-to for ambient lighting in living rooms and bedrooms.
- Reflector Trim: With a smooth, mirror-like interior, this trim maximizes light output. It’s ideal for kitchens and commercial spaces where you need bright, efficient illumination.
- Gimbal Trim (or Eyeball): These are your precision tools. The light can be pivoted and aimed, which is perfect for accent lighting on art, a fireplace, or architectural features.
- Wall Wash Trim: This trim has a shield that directs light toward an adjacent wall, creating a broad wash of illumination that makes a space feel larger.
Color Temperature and Rendering Index
Getting the quality of the light right is just as important as placement. This is where Color Temperature and the Color Rendering Index (CRI) come in.
Color Temperature, measured in Kelvin (K), describes how warm or cool the light appears. 2700K produces a warm, cozy glow like an incandescent bulb, perfect for relaxing in bedrooms and living areas. 4000K creates a cooler, neutral white light that's great for task spaces like kitchens and home offices. For more detailed advice, our guide on selecting your kitchen lighting is a great resource.
The Color Rendering Index (CRI) is a scale from 0 to 100 that measures how accurately a light source reveals true colors. For home interiors, always look for a CRI of 90 or higher to ensure your paint, furniture, and food look vibrant and natural.
Modern fixtures also offer incredible control. Tunable white technology lets you adjust color temperature on demand, while warm dim fixtures get warmer as you dim them, beautifully mimicking an incandescent bulb. As you finalize choices, be aware of energy codes, like ASHRAE 90.1 Electrical Lighting Compliance, to ensure your project is efficient.
Common Layout Mistakes and How to Fix Them
I've seen it time and again: even the best fixtures can look terrible if the layout is wrong. Learning from common missteps is the fastest way to get a professional result. Any good recessed lighting layout guide should arm you with what not to do.
The Dreaded Runway Effect
This is the most common mistake. It happens when lights are placed in rigid, straight lines down the center of a room, creating a sterile, grid-like pattern. This approach creates uneven lighting and harsh, unflattering shadows.
- The Fix: Think perimeter, not grid. Place fixtures closer to the walls—about 24 to 36 inches away is a good start. This technique washes the walls with light, making the room feel larger and more open.
Casting Shadows on Your Workspace
This is a classic error, especially in kitchens. People often place lights in the center of walkways. When you stand at the counter, your body blocks the light, casting a shadow right where you need to see.
- The Fix: This one’s easy. Position your kitchen lights so they are centered directly over the edge of your countertops. This ensures the light falls in front of you, perfectly illuminating your task.
Pro Tip: To avoid costly layout mistakes, it helps to have a basic grasp of how to read blueprints. Your lighting plan is a critical layer on those drawings, and getting it right on paper first prevents installation errors.
Ignoring Glare on Screens
In living rooms and home offices, a poorly placed light creates blinding glare on TV and computer screens. Aiming a fixture directly at a sofa is just as bad. The goal is to light the room, not the people in it.
- The Fix: Position lights so their beams won't directly hit screens or seating. I’m a fan of using wall-wash trims in these spaces to create soft, indirect light. And whatever you do, install dimmers—they are your best friend for controlling glare.
By sidestepping these blunders, you're on the path to a sophisticated design. For a deeper dive, check our article on other common home lighting mistakes.
Frequently Asked Questions About Recessed Lighting Layouts
Even with a solid plan, questions always come up. Here are quick, expert answers to some of the most common queries we hear from homeowners in the Monterey Bay area.
1. How many recessed lights do I need for a room?
There's no single magic number, but a simple calculation is a great starting point. First, calculate the room's square footage (length x width). Then, multiply that by the recommended "foot-candles" for the room type (e.g., 20 for living rooms, 40 for kitchens). This gives you the total lumens needed. Finally, divide that total by the lumen output of your chosen fixture to find the number of lights required.
2. Can I mix different sizes of recessed lights in one room?
Yes, and it can be a great design strategy when done with purpose. For instance, you could use larger 6-inch fixtures for general ambient light and smaller 4-inch adjustable trims to highlight artwork or a fireplace. The key is to use different sizes to signal different functions, which creates a layered, professional look.
3. What's the best color temperature (Kelvin) for recessed lighting?
It depends on the room's function and desired mood. For a warm, cozy, and relaxing atmosphere in bedrooms and living rooms, choose 2700K. For task-oriented spaces like kitchens, home offices, and bathrooms where you need brighter, more neutral light, 3000K to 4000K is ideal.
4. Should I choose baffle or reflector trims?
Choose the trim based on whether you want to soften or maximize light. Baffle trims have ribbed interiors that absorb stray light and reduce glare, making them perfect for creating soft, comfortable ambient light. Reflector trims have a shiny, smooth interior that maximizes light output, making them the best choice for kitchens and workspaces where brightness is a priority.
5. Are integrated LED fixtures better than using replaceable bulbs?
For nearly all new installations, integrated LED fixtures are the superior choice. They offer a much longer lifespan (often 50,000+ hours), better energy efficiency, and more consistent performance because the light source and housing are engineered as a single unit. While a replaceable bulb might seem convenient, the quality and longevity of an integrated system are unmatched.
6. Do I need a special dimmer switch for LED recessed lights?
Yes, absolutely. To avoid flickering, buzzing, or damaging your fixtures, you must use a dimmer switch that is specifically rated for LEDs (often labeled CL, ELV, or MLV). Older incandescent dimmers are not compatible. For guaranteed performance, consider a complete lighting system from a single manufacturer like Lutron, where the fixtures and controls are designed to work together flawlessly.
Ready to transform your home with a professionally designed recessed lighting plan? The experts at The Home Lighter, Inc. are here to guide you every step of the way, from initial layout to final fixture selection. We've been helping Monterey Peninsula homeowners create beautiful, functional spaces for decades.
Visit our showroom in Pacific Grove or schedule a consultation today!